All-you-can-stamp Christmas Card Buffet - £6.00

Thursday, 29 April 2010

Civil Ceremony Thank You Card


Hello Everybody! Sorry, I've been completely neglecting this blog again I'm trying to do 101 things at once at the minute!

Today I'm showing you a simple thank you card I've done.  A dear friend of our family is getting married to her partner in a couple of weeks and, when asked what they would like as a gift, she asked me if I could make some thank you cards for them, as our wedding gift to them.

As you can imagine, I was extremely flattered that she'd asked me.  I'm not sure what the colour scheme is, so I've kept it quite neutral, and as I was making 50 cards I wanted to keep them quite simple!

The cardstock I've used for the main body of the card is Kraft.  The foliage stamp I have used is from Vintage Vogue, which I love because it is so versatile. I stamped this in Old Olive ink. 

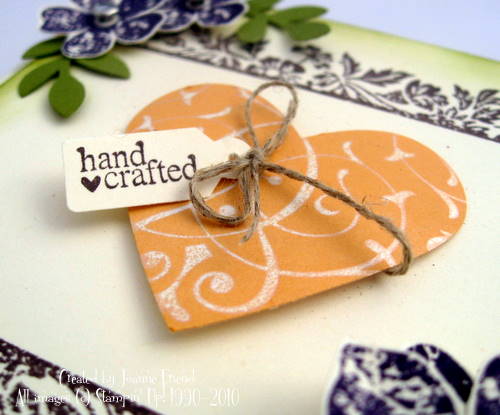
The heart is punched using the Full Heart Punch out of the beautiful Very Vanilla Bridesmaid Designer Series Paper, I tied twine around it and punched a little tag using the small tag punch and stamped it with the sentiment from the Tiny Tags set.


And here is the finished result!  I just hope they like it.....!

TFL! Joanne x

Tuesday, 13 April 2010

Scrapbook in a Box and Criss Cross Card


May is National Scrapbooking Month, and to celebrate this, my next class on 8 May we will be making a Scrapbook in a Box and a Criss-Cross card using the beautiful Vintage Vogue set.


The box is very similar to an exploding box, but simpler and not as time consuming to make!  If you don't want to make it into a scrapbook, you can always just make it into a regular keepsake/gift box.  But this is what it looks like inside as a scrapbook:


It opens up into a 12" x 12" scrapbook page! Pretty cool, huh?!


Additionally, we will be making a Criss Cross card to match the box, so you can give the whole set as a gift if you can bear to part with it!


During the class we will learn two techniques - brayering and rock n' roll.  You will get everything in your class to complete these two projects.  The class costs £10, or £25 if you include the Vintage Vogue stamp set (regular price £19.95). For more details and to book a place on the class take a look here.

For those who can't come to the class, the materials used are Very Vanilla, Apricot Appeal and Elegant Eggplant cardstock, Bride DSP, Chocolate Chip, Apricot Appeal, Old Olive and Elegant Eggplant inks, clear rhinestone brads and twine.

TFL! Joanne x

Wednesday, 7 April 2010

Colour Renovation - It's Coming!!

Okay, so I know how much you all like your Stampin' Up! colours, and how everything co-ordinates.  Well announcements have been going up all over the internet and so I feel I can announce the news here.  The Stampin' Up! colours are having a renovation!

Here's the new look list:


The new palette is fantastic.  Ever since SU! first came to the UK we have been asking for the beautiful In Colours - we are getting them, and in future they will last for two years instead of just one. As with the existing palette, there will be lots of co-ordinating products including ribbons, buttons and accessories, so still lots to play with!

As you can probably tell from the above chart, a number of colours, which were deemed not as popular, are being discontinued.  But you still have plenty of time to stock up on your favourites as the new Colour Renovation doesn't come into effect until the new catalogue starts in October. So if you like any particular colours, get your orders in while you can! Here is a full list of the colours which are being discontinued:


Don't forget we also have the Mini Catalogue which has just come out, so lots to keep us happy and busy for the next six months until this awesome change takes place.

If you have any questions, or if you would like to place an order, please get in touch with me.

TFL! Joanne x

Monday, 5 April 2010

Treat Cups Tutorial!


A few days ago I promised a tutorial based around the marvellous treat cups we now have in the Mini Catalogue. Well, here it is!


Okay, so first of all I start by doing my little picture.  For this card I'm using my favourite, the bubblegum machine again.  First I stamp the base, then I line up my 1 3/4" punch by the base and punch my hole for the treat cup, then I use my Stamp-a-ma-jig to stamp the little lid on top of my treat cup hole.


Next, I place my image over my mat (DO NOT stick it down yet!) I can then line my punch up over the hole and punch the hole out of the mat as well.


I then take them apart and sandwich my treat cup between my picture and the mat as shown. The treat cup has double sided tape on and is easy to line up on the mat. Then it's just a case of adding adhesive to the picture and placing it on top.


Next I take my actual card and punch a hole about a third of the way down. You don't need to use the 1 3/4" punch for this, you just need a hole that's big enough to get your treat through.  For this card I used a 3/4" punch.


Next, you need to make a "door" to cover your 3/4" hole, so you can keep your treats in place when they're not being eaten! 

Take a piece of co-ordinating cardstock sized at 2" x 2 1/2" and attach a punch tab to the end of it. This will be your door. Stick double sided tape around your matted picture, just on three sides, and attach it to your card.  Your little door should slide in from the left and cover the hole.


Fill your card with your chosen treat and slide the door into place.


Add your finishing touches, and there you have it - a gorgeous treat cup card!  They can seem fiddly to make at first, but once you get the hang of it they're very straight forward.

The materials used for this card are Real Red and Whisper White cardstock, a piece of patterned paper from the Pink Flamingo Designer Series Papers, 1/2" striped grosgrain ribbon in Real Red, Real Red ink and the Something Sweet stamp set and treat cups. The punches used are 1 3/4" circle, 3/4" circle and Round Tab Punch. All items are from the Stampin' Up! current catalogues.

Hope you like this card.  Remember, if you have any questions, or if you'd like to purchase anything from Stampin' Up! I'd love to hear from you!

TFL! Joanne x

Friday, 2 April 2010

A Blue Card for a Blue Day!

Hello Everybody!  Just in case you didn't know, today is World Autism Awareness Day.  Autism is a condition which is very close to my heart as my son is on the autistic spectrum. 

As part of World Autism Awareness Day, supporters need to wear something blue.  I'm sitting here in my blue jeggings and blue top, and I thought I'd show you a quick blue card that I've done to.  Here it is:


It's made using one of my favourite colours, Bashful Blue.  The stamp set I've used is Flight of the Butterfly, the "grass" is made using a strip of Old Olive cardstock that I've snipped using my Paper Snips.  It's finished off with a Chocolate Chip tafetta ribbon to match the Chocolate Chip background flowers and the flower accent on the butterfly.  Hope you like it!

TFL and I'll be back again soon! Joanne x

Thursday, 1 April 2010

It's here and it's live!


No joke - the hugely anticipated new mini catalogue is now live! You can order anything you want out of it!


The most popular item seems to be the bird punch so far.


I made this card using the bird punch and the beautiful new Vintage Vogue set. Colours are Pale Plum and Chocolate Chip ink on Whisper White cardstock.  The card itself is our Kraft cardstock and the little bit of sparkle is our Dazzling Diamonds glitter.


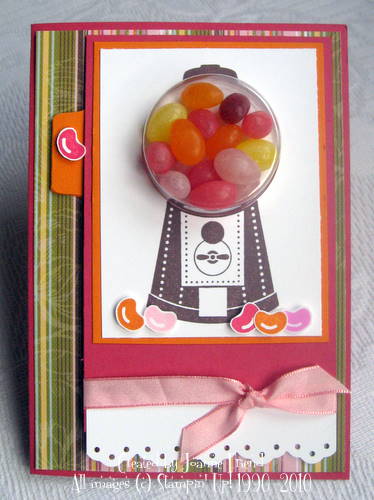
I love everything in our new mini catty, but at the minute I'm loving the treat cups most!  I made this card yesterday.  The striped paper comes from the gorgeous Sweet Pea papers. The cardstock used is Rose Red and Pumpkin Pie, together with Chocolate Chip ink.  I've also used the Tab Punch, Eyelet Border Punch and Pretty in Pink tafetta ribbon.

They may seem complicated to do, but they're not once you're shown how.  I'll try and do a tutorial tomorrow or sometime this weekend, so keep checking back!

If you haven't got a copy of the mini catalogue and would like one, please get in touch with me.  Otherwise you can have a browse by following the link on the right hand side of my blog. Just click on the picture!

If temptation is getting the better of you and you'd like to order please just get in touch!

TFL! Joanne x

Saturday, 27 March 2010

Welcome to the Mini Blog Hop!


Hello Everybody! Let's go to the hop......!
 
Many thanks for stopping by and joining in our Stampin' Up! Blog Hop to launch the new Mini Catalogue!  There are 16 of us in this blog hop loop. So once you've seen a blog twice, you've done the full tour!

The catalogue goes live on 1 April and will run concurrently with the main catalogue until 30 September. 

Thank you to my lovely predecessor, Melanie for her gorgeous designs. If you've just started the blog hop at my blog, then welcome and thank you for joining in! Grab yourself a cup of tea and sit back and enjoy! Now, on with the crafty stuff!


I chose to showcase the beautiful Day and Night Designer Series Papers.  The papers are only going to be available until the end of September, so if you like them, grab them while you can! In the pack there are 10 sheets of double sided paper and two sheets of polka dot acetate to play with.

For the above layout I teamed them with Pale Plum cardstock, twine and the beautiful new Old Olive satin ribbon.  Which is beautiful and sumptious and a dream to work with! I finished off my layout by making the title using Happy Everything stamp set.


Next up we have this set that I made of an easel card, small peek-a-boo treat box and box in a bag.  I wanted to show how, as well as being quite classical and gothic in style, the papers can also be give a modern and ditzy look, by using the polka dots included in the papers.  The cardstock and ink used is Real Red, the stamp set is Simply Said and the punches used are the Large Heart, Large Oval and Scalloped Oval.  The various ribbons used are red and black gingham checks and Whisper White tafetta.


This next item is my favourite piece I have created.  I based my design on a lovely little set of drawers by Qbee which she calls Darling Drawers.  They're a lovely little size for holding bits and pieces.  As you can see from mine, I have used them to hold my gorgeous new Real Red satin ribbon and my crocheted white flowers. 


The main body of the drawers is made from a 12x12 sheet of Whisper White cardstock which I stamped using the new Very Vintage Jumbo wheel in Basic Black.  The drawers are made using the Day & Night papers and the little handles are made using Filigree brads coupled with rhinestone brads for a bit of bling.

I may do a class on these gorgeous little drawers in the near future. We'll see what sort of reaction they get!

Well, I hope you enjoyed stopping by to see my Mini Catalogue offerings.  Please feel free to get in touch with me if you have any questions about anything here or you would like to purchase any of the items I've showcased.

I will now hand you over to the supremely talented and lovely to boot Dawn Silver.  You're sure to be in for a treat on her blog!

Many thanks for visiting.  Please pop by again soon! :O)

Joanne x

Get Ready!


Tomorrow is the Stampin' Up! Mini Catalogue Blog Hop! The catalogue will go live on 1 April, and tomorrow from 10am there will be three loops running.  Myself and lots of extremely talented SU! demonstrators will be showcasing the gorgeou snew products we have to offer you, so check back tomorrow and join in the fun!

Jo x

Saturday, 20 March 2010

Just a quickie


I've recently become obsessed with Stampin' Up! Confetti cardstock.  It's a beautiful white cardstock with lots of little petal and grass inclusions, like handmade paper, but it's very smooth at the same time. It's great for making more rustic cards.

This one was made quickly yesterday for my dear friend Marja, just for being lovely and a wonderful customer! I used the Confetti cardstock, Chocolate Chip and Old Olive Cardstock. The tree and bunny are both from the Forest Friends set, stamped in Old Olive and Chocolate Chip. The sentiment, again in Chocolate Chip is from the Fresh Cuts set and it's all finished off with Chocolate Chip taffeta ribbon.

Anyway, that's it for now.  I'm off to get ready for our crop!

TFL! Joanne x

Wednesday, 17 March 2010

Easter Bunnies!


I had a wonderful day last Thursday at the Stampin' Up! Training day here in Sheffield.  It was lovely to get together with everyone again. These are the swaps that I did for the day.  With Easter edging ever closer I thought I'd give everyone a little Easter gift.

As you can see it's a little pouch that can hold a delivious bar of chocolate!  The best fit for this pouch was the new Galaxy Bubbles bar, or one of the Kit Kat Easter bars fits well too.  Whatever you choose will be equally delicious if it's chocolate!

Here's a quick run down on how to make it.


Basically, you just need to cut a 2 1/4" strip from a sheet of A4 cardstock, along the length of it, so you have a nice long strip. I used Bashful Blue and Old Olive.
This needs to be scored at 2", 2 1/2", 7" and 7 1/2".


Using the SU! Large Oval punch, punch out an oval in the 2" section.  Add some Sticky Strip as shown.


Fold it over and press down hard so it won't come undone.


When you fold the flap over, you will notice that there is a gap.  Cut a 1 1/2" wide piece of Very Vanilla cardstock, cut it with the Lacy Edge border punch and stick it to the bottom.  Cover the edge with Caramel gingham ribbon and your sentiment.


Inside, stick a little piece of Velcro where you want the flap to close, just underneath the oval.


Now onto making the bunny!  All the punches used are Stampin, Up! The cardstock used is Creamy Caramel, Regal Rose and Basic Black.


Ink all your pieces in their corresponding ink colours to give them some depth.The picture above is quite self explanatory, but for clarity you stick the two petals from the 5 petal punch onto the ovals for his ears, then stick them behind the 1 3/8" punch which is his head. You can leave his ears as they are but I think it looks cute to fold one over and stick it down with a glue dot!

 The 3/4" punches go on his face as his cheeks and the little heart from the Heart to Heart punch goes on top.  Cut a small rectangle of Whisper White cardstock to slip underneath his cheeks for his teeth. Stick the two little 1/4" black circles on for his eyes and add a little glint with white pen.


I'm really pleased with these bunnies. I think they would make lovely card fronts too, whether for Easter or a new baby!

TFL and Happy Easter! Joanne xx

Wednesday, 3 March 2010

Cracked Glass Technique


I've started trying out various techniques and this is the latest one I've been doing with my class.  I love thisone, it's so effective. Here's what to do:


Stamp your image (this one is from Pocket Sillhouettes and uses Perfect Plum and Old Olive inks).  Then ink the whole piece with Versamark.


Cover the entire piece with clear UTEE (Ultra Thick Embossing Enamel).  If you use UTEE, you only have to heat it once and you're done.  If you use normal clear embossing powder, you will have to repeat the embossing process another four times to get a good thickness.


Then it's just a case of bending your image to create the cracks in the UTEE/embossing powder.  Don't be shy - it does take some oomph! At first I was gingerly bending it, but you really do need to almost fold the cardstock to get it to crack.

You can then leave the image as it is, or if you would like your cracks more prominent, sponge on some Close to Cocoa ink and then wipe off the excess with a paper towel. 


And here's the finished card! The cardstock used is Perfect Plum, Old Olive and Very Vanilla. 

The stamp sets used are Circle of Friendship, Pocket Sillhouetts and En Francais background stamp.

It was finished off with a bucklet from the Hodge Podge Hardware and Chocolate Chip tafetta ribbon.

The lace edging is done with the Eyelet Border Punch.

TFL! Joanne x

Tuesday, 2 March 2010

10 for £10!


Yes, I know I can't count! There are 9 cards in the photograph, but, trust me, there will be 10 cards on the day!

This is my latest class I am doing - 10 cards for £10.  Everyone will create 10 gorgeous Stampin' Up! cards for the princely sum of £10! It should be great fun!

The new mini catalogue comes out soon, too.  Can't wait.  I've just spent a small fortune on preorder. I just couldn't resist! Hopefully should be able to share a few sneaky peeks really soon!

In the meantime, here are the photos of the cards in my class close up.  I will find the 10th one, it's around here somewhere!


TFL! Joanne xx