Thursday, 5 April 2012
April Class Now Booking!
Hello Everybody!
This post is to announce that April's class is now booking. It will take place on 28 April at Beauchief Baptist Church, Sheffield.
As you can see from the photo above, we will be making four cards complete with a co-ordinating box using the Creative Elements stamp set. I'll now take you through the cards we will be making.
The first card will be made using the stamping off technique and two colour marker blending technique to produce the above card. I've tried to make all the cards as generic as possible but you are more than welcome to make changes to suit your own needs.
To make this card we will be getting to grips with the paper crimper and also the Stamp-a-ma-jig. The colours I have used for this set are Crumb Cake, Old Olive, Early Espresso and Calypso Coral.
For this next card we will be using paper piecing techniques and also distress embossing to make a very simple but very striking card.
The final card will use the main filigree stamp to make a floral design including ruffled ribbons.
If you'd like to book a place on this class please visit my website HERE. There are various options and add ons that you can have. Also, please remember that if you spend over £45 this month you will receive a set of patterned papers of your choice and this class qualifies for this! Hope to see you there!
TFL! Joanne x
Tuesday, 3 April 2012
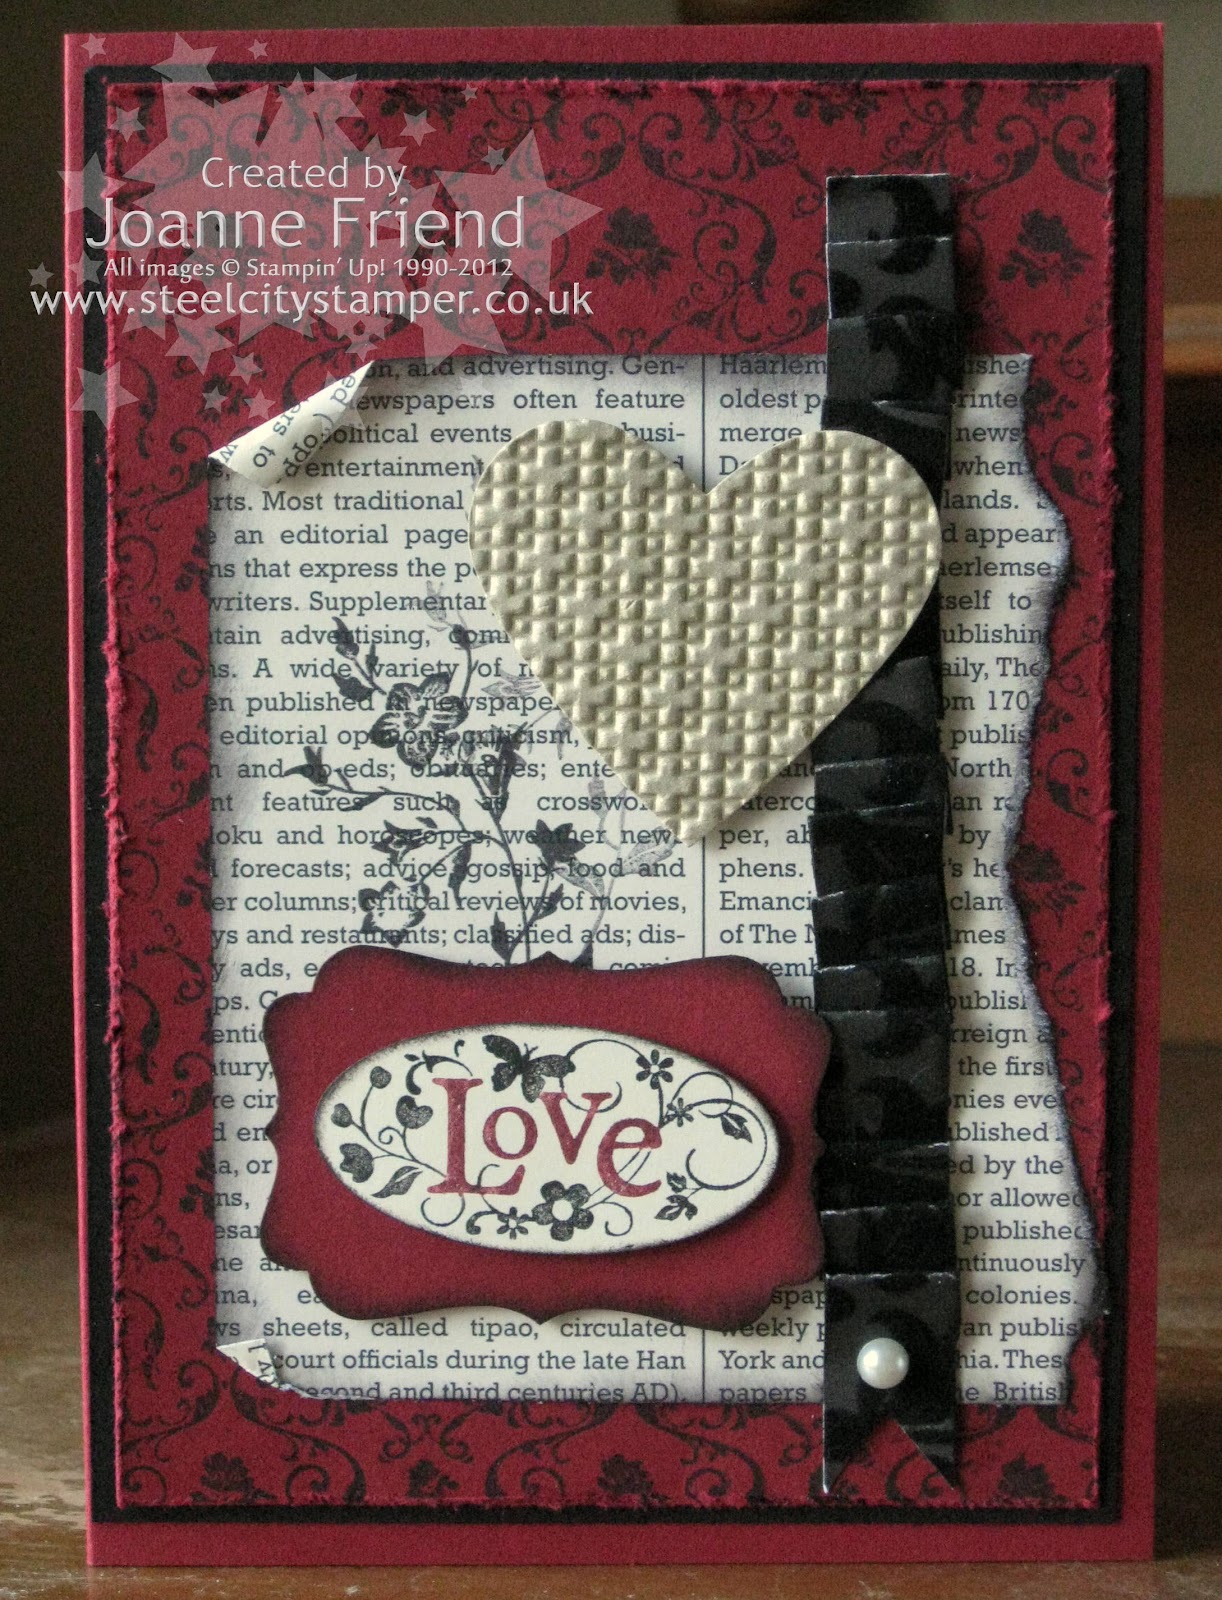
Love Card
Hi Everybody!
Just a quick card today. I made this using a couple of sets from the Spring Mini. The "Love" sentiment is made using You Are Loved (123779 - clear) and the little foliage behind is from the sweet Charming set (125829 - clear). The background stamp is called Parlour Prints (122525) and is from the main catalogue.
Colours used are Basic Black, Cherry Cobbler, Very Vanilla and Brushed Gold.
The reason I posted this card is to remind everyone that the Spring Mini will be ending at the end of April to make way for the Summer Mini catalogue that will be going live on 1st May, so if you've been putting off getting anything, then get it quick!
Hope you like this card. Any questions or queries about it please just get in touch.
TFL! Joanne x
Saturday, 31 March 2012
Peep-O! Happy Easter!
How do you like this cute little hen house?! It's super easy to make, let me show you how!
First, take an A4 sheet of Crumb Cake cardstock. Along the long side, score it at 7cm, 14cm, 21cm and 28cm. Along the short side, score it at 5cm and 14cm.
Now is the time to stamp your woodgrain on your hen house. The easiest way to do this is to fold your cardstock in half on the score line. Ink the Woodgrain background stamp (117100) up with Crumb Cake ink, and stamp on the cardstock so the middle squares are covered. Flip it over and do the same for the other side, so all four middle squares are stamped. Don't worry if you get the image on parts of the top and/or bottom squares. It doesn't matter and it won't show.
Next we need to make the door hole for our hens to go in and out! Turn your cardstock over and, with the five cm score line at the bottom, (the side with only two flaps at the bottom) fold the second flap inwards as shown above. Centre your punch between the vertical score lines and push it in as far as it will go. Then punch the hole out.
Now you're annoyed because you've punched a hole in your flap as well as your house - don't worry!
As you can see from the photo above, trim the flap off just below the hole, so you have a piece of flap remaining that is approximately 1cm wide. Apply glue to the small flap at the far left, and all three bottom squares apart from the one with the hole above it - see photo above.
Fix the small flap to the edge of the "wall" and fold the bottom flaps inwards to make the floor. It doesn't matter what order you do them in, but obviously the one with no glue gets turned in last. Ta-dah! You have your hen house!
Now we need to make a little "roosting bar" for our little chick to "perch" on. Here goes:
You need to cut a square of Crumb Cake Cardstock 8.8cm or 88mm. That's just a fraction short of 9cm. This measurement is important as you need your perch ever so slightly smaller than the box so it slides in easily.
You then need to score it on all four sides at 1cm. Stamp the cardstock again with your Woodgrain background stamp and Crumb Cake ink pad. Cut up to make the little tabs on each of the score lines by 1cm to make little tabs and attach glue or sticky strip to these. Punch a hole in the centre using your 1 3/8" punch (you will have to bend the flap down as you did before with the main box, but it won't punch anything out of the flap).
Slide it into your hen house.
Now we need a roof to keep him warm and dry. Let's make one!
Take a piece of Chocolate Chip cardstock measuring 9cm x 14cm. Score it in half along the 14cm side at 7cm. Then put the whole piece through a paper crimper (or ribbler as I like to call it, just because I love that word!) so it looks a bit like corrugated iron or something......!
Attach one half of the roof to the back flap of the box, allowing a little overhang at the back.
The front part of the roof can be held in place with either a small glue dot or a piece of velcro if you've got some handy.
To decorate the house I used the Bird Builder Punch (117191) for the foliage which I punched in Old Olive cardstock and the flowers were made using the Boho Blossoms Punch which were punched with Melon Mambo cardstock and small pearls (119247). The sentiment on the roof is from the Easter Blossoms stamp set (122057 - from the Spring Mini catalogue) and punched out using the Extra Large Oval Punch (119859).
The chick I have used is a Smarties Easter chick available from most newsagents and supermarkets. Here he is nestled in his coop (he fits very cosily in the hole of his "perch" at just the right height to be seen through the "doorway", with a few other eggs that haven't hatched yet. ;O)
The "straw" to make his nest is made by cutting very thin strips (about 1-2mm) of So Saffron cardstock and feeding them through the ribbler. Then arrange them around him and putting the other eggs on top of it.
Close the roof down with your glue dot or velcro and there you have it! A lovely little chicken coop with chocolate eggs and a little chick that's already hatched!
I hope you like this tutorial. If you have any queries or would like to order all or any of the components to make these Easter boxes, please just get in touch.
TFL! Joanne x
Tuesday, 13 March 2012
March Class Now Booking!
Hello Everybody!
This is March's class which is now open for booking. This month we will be making a paper bag album using the Tickets and Tags Simply Scrapping Kit. It's a fantastic album, if I do say so myself (!) with loads of mats for photos and journalling and 15 pull out tags and cards for additional bits and pieces. There's also plenty of room to keep mementoes of special days.
The basic cost of this kit is £20. That includes half a pack of Simply Scrapping (you will still have plenty left to make a few cards or embellish other scrapping projects). There is also an option to include the ink pad that we use and also another option to include the wonderful Number It stamp set that I have used for the album's title.
If you'd like to book on this class, it will be taking place on Saturday, 24 March at Beauchief Baptist Church, Hutcliffe Wood Road, Sheffield. All details can be found at my website HERE.
And if you don't live close by or can't make it, FEAR NOT! I am going to offer instructions by email and/or a kit so you can still enjoy making this album yourself in the comfort of your own home. Just keep an eye on my website and I'll let you know when the info is ready!
Any questions please get in touch. Otherwise hope to see you there!
TFL! Joanne x
Tuesday, 6 March 2012
One Colour/No Colour Challenge!
Just quickie today. I decided to have a go at this week's Try a New Technique on Splitcoast Stampers. This week the challenge was to create a card, preferably with a line drawn image, that used only one colour ink and no colouring in. Same goes for the sentiment. Pretty straightforward so I had a bash!
The card base is Wisteria Wonder and the embossed part is Brushed Gold cardstock. I love using both the Brushed Gold and Brushed Silver with the embossing plates. The shine on them really gives lovely definition. The image is from the hostess set Simply Soft. It was stamped on Ivory cardstock - bit rougher than Very Vanilla for a more rustic look. I finished it off with a mat of Soft Suede and my old favourite, some linen thread. The sentiment is from the You Are Loved set which is in our current mini. This is my favourite set (for now)! Added a couple of pearls to bring attention to the sentiment and there you go! All finished!
TFL! x
Saturday, 3 March 2012
Rose Card
Hello Everybody!
The rose image is from You Are Loved which is in our current Spring Mini catalogue. I coloured the rose stamp with Pumpkin Pie, Real Red and Basic Gray inks and then stamped it. This was then punched out with the Large Oval punch and then I decided to use the cracked glass technique on it to make it a bit more interesting. I did this by heat embossing it with clear embossing powder three times, then, when it's cooled down, just bending the image to crack it. Then I just wiped some more Basic Gray ink over to bring out the cracks.
What I love about this is that the Large Oval fits into the oval of the Textured Impressions Designer Frames embossing set. This was done using our Brushed Silver Cardstock.
The Basic Gray card base was stamped with the script stamp from the Charming set (another Mini Catalogue offering) and embellished with Very Vanilla satin ribbon and Victoria lace which I dyed using Basic Gray ink to give it that shabby chic look!
The lollipop rosette was made using the Lace Ribbon Border, Boho Blossoms punch and a Fire rhinestone brad.
Once it was all stuck together I finished it off by spritzing with some more Basic Gray ink.
Hope you like it. Any queries please just message me!
TFL! Joanne x
The rose image is from You Are Loved which is in our current Spring Mini catalogue. I coloured the rose stamp with Pumpkin Pie, Real Red and Basic Gray inks and then stamped it. This was then punched out with the Large Oval punch and then I decided to use the cracked glass technique on it to make it a bit more interesting. I did this by heat embossing it with clear embossing powder three times, then, when it's cooled down, just bending the image to crack it. Then I just wiped some more Basic Gray ink over to bring out the cracks.
What I love about this is that the Large Oval fits into the oval of the Textured Impressions Designer Frames embossing set. This was done using our Brushed Silver Cardstock.
The Basic Gray card base was stamped with the script stamp from the Charming set (another Mini Catalogue offering) and embellished with Very Vanilla satin ribbon and Victoria lace which I dyed using Basic Gray ink to give it that shabby chic look!
The lollipop rosette was made using the Lace Ribbon Border, Boho Blossoms punch and a Fire rhinestone brad.
Once it was all stuck together I finished it off by spritzing with some more Basic Gray ink.
Hope you like it. Any queries please just message me!
TFL! Joanne x
Sunday, 19 February 2012
Fancy Folds Class - 25 February 2012
Hello Everybody!
Sorry I've been a bit slow at getting this month's class sorted and up on the site - had quite a busy month with one thing and another.
The class this month is called "Fancy Folds" and will entail us making four cards that are a little bit different than your bog standard one fold card. Let me take you through them:
First of all we have this beautiful free standing pop up card. Despite the appearance, it does fold down flat to fit in a normal C6 envelope! For this card we will be using the Everything Eleanor stamp set and one of my favourite colours at the moment - Pool Party.
Next is the Double Pocket Fold card. This is a super versatile card in that, as well as the normal card fold in the middle, it has two pockets on the front, meaning it can hold extra writing, photographs, gift cards, or anything you may wish to include.
The third card is called the Double Dutch Fold. This is made using the new You Are Loved set which is in our Spring Mini catalogue (one of my favourite sets at the minute!) A lovely unusual card.
Last but not least is the Side Step card made into a dresser with a dress on a hanger. This card can be altered for many occasions including a baby card or a wedding card.
For this class, everything will be cut and prepared for you, but full instructions will be given for you to recreate the cards at home.
If you would like to attend this class, the price is £10. Just get in touch with me at hello@steelcitystamper.co.uk to book your place.
TFL! Joanne x
Wednesday, 25 January 2012
Spiced Bookmark
Hi Everybody!
Here's a quick bookmark I made using some of my favourite products at the moment.
The cardstock is Pool Party and the papers are the new Spice Cake DSP (124003) from our new Mini Catalogue.
There is also a stamp set in this suite that I used on the background of the bookmark, this is called Spiced Paisley (127155).
Also available in this range are fabrics, buttons and delicious Vanilla Velvet ribbon. They're only available until the end of April, so if you like them get them while you can!
On the back of this bookmark I used the Letter It Alphabet (122840) to personalise it with my friend's initial and an adorable butterfly from the SU! exclusive Beautiful Wings Embosslit Die (118138).
Hope you like it!
TFL! Joanne x
Here's a quick bookmark I made using some of my favourite products at the moment.
The cardstock is Pool Party and the papers are the new Spice Cake DSP (124003) from our new Mini Catalogue.
There is also a stamp set in this suite that I used on the background of the bookmark, this is called Spiced Paisley (127155).
Also available in this range are fabrics, buttons and delicious Vanilla Velvet ribbon. They're only available until the end of April, so if you like them get them while you can!
On the back of this bookmark I used the Letter It Alphabet (122840) to personalise it with my friend's initial and an adorable butterfly from the SU! exclusive Beautiful Wings Embosslit Die (118138).
Hope you like it!
TFL! Joanne x
Tuesday, 24 January 2012
IT'S SALEABRATION TIME!!
It's here at last, a little later than last year, but it's Saleabration time again! YAY!
For those of you who don't know, from today until 31st March, for every £45 you spend you can receive one of the following gorgeous stamp sets or paper stacks absolutely free! Also, if you have a workshop that totals £300 or more, you also get a free set!
So without further ado, allow me to introduce them to you!
This set is Elementary Elegance. A beautiful set which co-ordinates with many other SU! sets, most notably Artistic Etchings. Note that the inside of the main frame is tailor made for the Curly Label Punch (119851).
This set is called Outlined Occasions and is perfect for any celebration you can think of. It looks fab coloured in with blender pens where you can shade the lettering!
Sprinkled Expressions is the next set and is so much fun! It's great for making sets of cards to give away as gifts and suits a multitude of events.
Now, I have to confess that this set, Fresh Vintage, is my favourite. Anyone who knows me knows I love Vintage and this set is just superb. What's more, you will notice that the square stamp has an outline - in the new mini catalogue there is a postage stamp punch to match!
But that's not all, this year we have more than just stamp sets. Get a load of this!
Everyday Enchantment papers. They are absolutely lushness personified! The keen eyed amongst you will have noticed that they actually match the Fresh Vintage stamp set, so if you can stretch to £90 in sales they can both be yours!
All of the beautiful stamp sets are available in a choice of either wood mount or unmounted rubber. The gorgeous papers come in a pack of 12 sheets - 2 sheets each of 6 double-sided designs. Plenty for all your cardmaking and scrapbooking needs!
If you'd like to place an order or book a workshop, please get in touch!
TFL! Joanne x
Sunday, 14 August 2011
New Class - Delft Tile Album
Hello Everybody!
It's been a hectic few weeks what with the school holidays and all. Anybody with kids will understand I'm sure!
So, without further ado, here is my latest class! The class will take place on Saturday 27th August at Beauchief Baptist Church, Hutcliffe Wood Road, Sheffield. It will run from 10.30am until we finish, but probably until around 2pm.
I have called this class Delft Tile Album. We will be doing no stamping in this class, but instead using the gorgeous Blueberry Crisp Designer Series Papers to make an album with tons of room for lots of photos and journalling. Perfect for cataloguing all those Summer trips!
Each page has a front as shown, plus, once turned over, you will see it has a flap which lifts up and also a slide out section for more display space.
For this class you will receive half a pack of Blueberry Crisp DSP, cardstock and embellishments - everything you need to complete this album. Also, of course, there will be hot beverages and all you can eat cake! All of this for the price of £10.
If you'd like to book a place, please got to my website HERE. Please note I will need final numbers by Friday 19th August so hurry!
Hope to see you there!
TFL! Joanne x
It's been a hectic few weeks what with the school holidays and all. Anybody with kids will understand I'm sure!
So, without further ado, here is my latest class! The class will take place on Saturday 27th August at Beauchief Baptist Church, Hutcliffe Wood Road, Sheffield. It will run from 10.30am until we finish, but probably until around 2pm.
I have called this class Delft Tile Album. We will be doing no stamping in this class, but instead using the gorgeous Blueberry Crisp Designer Series Papers to make an album with tons of room for lots of photos and journalling. Perfect for cataloguing all those Summer trips!
Inside there are six pages which are made by folding the paper in an origami fashion. This helps to create the different compartments.
Each page has a front as shown, plus, once turned over, you will see it has a flap which lifts up and also a slide out section for more display space.
For this class you will receive half a pack of Blueberry Crisp DSP, cardstock and embellishments - everything you need to complete this album. Also, of course, there will be hot beverages and all you can eat cake! All of this for the price of £10.
If you'd like to book a place, please got to my website HERE. Please note I will need final numbers by Friday 19th August so hurry!
Hope to see you there!
TFL! Joanne x
Sunday, 3 July 2011
Christmas in July!
This card is made using using punch art and embossing folders to create a clever fireplace scene. The little bows are quite fiddly, but I love making them, so they will all be done for you!
This is a very simple card using the ever popular Big Shot Top Note die. By making this card we will be using the masking technique.
This card uses Serene Snowflakes as well as the Welcome Christmas set to make a beautiful frosty card.
The gift bag matches the above card, so it can be given as a set if you like. The bag is decorated completely with the Serene Snowflakes.
If you'd like to come to the class it will be taking place on Saturday 23rd July at 10.30am at Beauchief Baptist Church. Full details can be found at my website HERE.
TFL! Joanne x
Wednesday, 22 June 2011
One Great Year Album
Here's an album I did recently using the One Great Year scrapbooking kit (#118705 - £17.75).
This wasn't my idea, I got the instructions for the album from Andrea Walford and her Family Treasures Scrapbook class. Family Treasures is a scrapbook kit that is no longer available, so I used the same album design, but rejigged it myself using one of our latest kits.
What's even better is that you only need half of the kit to make this, so you could make two - one for yourself and one as a gift! Here are the other pages:
On the left are two tags that pull out for photos or journalling.
On the right you will see that behind the Elegant Eggplant mat is another pull out for journalling.
Lots more space for journalling!
Another pull out on the left behind the green mat.
Another pull out on the right.
I absolutely love this kit as it lends itself perfectly to this type of album. The only extras I had to add were a few clips from the clip assortment (#112580 - £7.95) and Basic Black tafetta ribbon (#119962 - £6.25). It was quite time consuming, but completely worth it. The design of the album is beautiful when finished and well worth the extra effort!
TFL! Joanne x
This wasn't my idea, I got the instructions for the album from Andrea Walford and her Family Treasures Scrapbook class. Family Treasures is a scrapbook kit that is no longer available, so I used the same album design, but rejigged it myself using one of our latest kits.
What's even better is that you only need half of the kit to make this, so you could make two - one for yourself and one as a gift! Here are the other pages:
On the left are two tags that pull out for photos or journalling.
On the right you will see that behind the Elegant Eggplant mat is another pull out for journalling.
Lots more space for journalling!
Another pull out on the left behind the green mat.
Another pull out on the right.
I absolutely love this kit as it lends itself perfectly to this type of album. The only extras I had to add were a few clips from the clip assortment (#112580 - £7.95) and Basic Black tafetta ribbon (#119962 - £6.25). It was quite time consuming, but completely worth it. The design of the album is beautiful when finished and well worth the extra effort!
TFL! Joanne x
Subscribe to:
Posts (Atom)